Category Archives: design research

Excited for the DIYSummit (which is *not* a webinar)

Tomorrow, September 17 at 12pm CT Mark Trammell and I will be presenting a talk on “Effective User Research” as part of the DIYsummit. I’m pretty excited. This will be a great group of speakers, and the folks behind the scenes (waving to Christopher and Ari) know their stuff.

The DIYsummit will take place online. This does not, however, make it a “webinar” at least as far as my definition goes. A webinar is a slog through PowerPoint slides, presented online by a lifeless salesperson trying to sell some enterprise software solution. The DIYsummit looks like it will be a well-crafted and really engaging online learning experience.

Anyway, wish us luck and I hope to see you online tomorrow!

The DIY Summit | Online September 17, 2009 | presented by Environments for Humans

Why webinars are generally bad and how they could be better

The typical “webinar” that I have experienced thus far involves an instructor speaking on a conference call while she pages through a series of slides that are viewable using screen sharing software such as WebEx. There could be some great webinars out there, but the ones that I’ve been involved with as a participant could be much better, both from pedagogical and user experience perspectives.

In a classroom, the instructor can look around the room to see if the students look confused or bored. This feedback helps her know if she should go back and explain a difficult point in a different way, or maybe tell a good story to wake the audience up. She can also ask poll the students, through a show of hands or more advanced solution, to discern the level of expertise of the group. She can then adjust her presentation as necessary.

A webinar instructor cannot see her audience. She doesn’t know if people are paying attention or falling asleep. She can’t easily poll her audience about their understanding of the material. She slogs through, slide by slide, with no way to easily adjust her delivery of the content or even know that she should adjust it.

Now let’s think about what a website can do, pedagogically. A user can go through material at his own speed, diving deeper into subject matter that he’s interested in or looking up any words that he hasn’t heard before.

The rigid nature of the webinar environment means that participants can’t adapt the experience to meet their learning needs, like they can on a website, and the instructor can’t adapt her presentation delivery like she can with an in-person lecture.

I posit that the webinar could be a much better learning tool by incorporating some of these aspects of in-person and online learning:

  • Have the slide deck available for viewing or downloading at the beginning of the presentation. The participants can then go back and look at previous slides if they missed something, or skip ahead if they want to understand where the discussion is going.
  • If the screen sharing tool has a chat function, use it. Ask the participants at the beginning of the session to share their level of expertise with the subject matter. You can make this easier by specifying for example that 1=newbie, 2=somewhat familiar, and 3=very familiar, and have them just type that one number. A quick scan will help clarify what kind of audience you have.
  • Decide on a Twitter hashtag for the session, and share it at the beginning. Encourage participants to use the hashtag in their tweets. Monitoring the Twitter backchannel is a good way to know if the participants are bored or confused. (They are unlikely to use the screen sharing chat function to do this.)
  • Share a list of URLs with the participants where they can get more information about your subject matter. Advanced members of your audience will benefit from being able to go deeper into the topic while listening to the presentation.
  • Encourage the participants to use either the screen sharing chat function or Twitter to ask questions during the presentation.

Let me know if you have other tips! Let’s make webinars a better learning experience.

How to set up remote user testing with a Mac

I’ve started venturing into the world of doing remote user testing. This means that instead of recruiting people to come in to the office to do user tests, I use screen sharing technology to see how they use the web site I’m testing on their own computer.

This has lots of benefits, most notably:

  • I’m able to talk to people all over the world, not just in San Francisco.
  • I can see how the participants use the site on their own machines and browsers.
  • Recruiting is typically the most difficult and annoying part of doing user testing. Remote testing is easier to recruit for, since it doesn’t require the participant to go anywhere.

The technical side to this isn’t super easy, but it shouldn’t dissuade you from trying remote testing. I learned the basics of how to set up remote testing thanks to help from my awesome friend Nate Bolt. (Be sure to read his book on remote research when it comes out later this year!)

Here’s the skinny — UserVue is a great tool that is specifically built for remote testing. However, it only works on PCs. If you’re on a Mac, you have to assemble more of a Rube Goldberg-ian app suite. I did lots of tinkering with settings and applications to make this work; when I was done, I realized that these notes could be helpful for others.

THE TOOLS

You will need:

  • Mac (either laptop or desktop)
  • Acrobat Connect for screensharing. You do not need to buy the “Pro” version, Acrobat Connect Pro. Note that the Adobe site hides the cheap, non-Pro version. Cost: $39.95 a month.

    UPDATE:
    There is a free version that is basically the same but has shinier icons. It’s also slightly less annoying. In this version, you need to click on the participant name and request that they share their screen — no need to “autopromote participants to presenters.”
  • Soundflower to enable audio recording. Be sure to also install Soundflowerbed during the installation process. Free
  • iShowU HD for recording screensharing and audio. You do not need to buy the “Pro” version, iShowU HD Pro. $29.95
  • Skype for audio. Free to use but you will need to pay to call phones from Skype. Pay in increments of ‚Ǩ10.
  • Headset for using Skype. You will need a headset that has a built in microphone. I’m using the Plantronics GameCom Pro 1 for no other reason than I found one in our office. It works well.

(Note that if you’re on a PC, UserVue does what Soundflower + Connect + Skype + iShowU does.)

SETUP INSTRUCTIONS

Sound on the computer:

Under System Preferences on the Mac, select Sound, then:

  • Output: Soundflower (2ch)
  • Input: headset

Soundflowerbed:

Under Soundflower (2CH), change from None (OFF) to headset

Soundflower

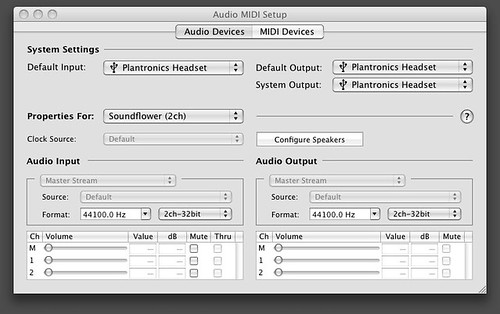
Select “Audio Setup…” then Audio Devices

  • Input: headset
  • Default Output: headset
  • System Output: headset
  • Soundflower - Audio MIDI Setup

    Skype:

    Under Preferences, select Audio

    • Audio Output > Soundflower (2ch)
    • Audio Input > headset

    Skype preferences

    iShowU HD:

    In the menu bar, make sure:

    • Microphone capture enabled
    • Application capture enabled

    Go to Advanced Options and click on the megaphone to adjust sound preferences.

    • Select: Record audio from applications
    • Select: Record sound from input device
    • DO NOT Select: Monitor input device
    • Select name of headset from dropdown

    Choose the area of your screen to record. Click “Choose” to select your capture area and toggle over to your Adobe Connect window and trace around the meeting space.

    iShowU HD settings

    Adobe Connect:

    Under “Meeting,” select “Auto-Promote Participants to Presenters

    Acrobat Connect preferences

    SESSION MECHANICS

    • Moderator calls participant using Skype. Audio quality will be better if you call them on a mobile or landline number rather than on Skype.
    • Make sure that they are at the Connect URL: http://connect.acrobat.com/XXXX
    • Instruct the participant to Select “Enter as Guest” and type their name. Tell them that you will approve them to enter the meeting. Approve them to enter the meeting once they have done this.
    • Ask the participant to click “Share Your Screen.”
    • Tell the participant that they will be prompted to install the Adobe Acrobat Connect Add-In if they don’t already have it.
    • Connect will then open for them in a new window. Ask them to click “Share Your Screen” again.
    • Tell the participant that where you see “Start Screen Sharing” select “Applications” then the name of the window where the website is open that you’ll be discussing.
    • At the end of the session remind the participant to select “Stop Sharing” at the bottom of the Connect window.

    – – – – – – –

    I’m interested in hearing about your experiences doing remote testing. Do you have gripes? Inspiring stories? Tips for other people doing user research? Good luck and have fun!

    Google AdWords: How to tell a story about interface changes

    Users don’t tend to ask for large-scale site overhauls; massive changes mean having to learn a new UI, and that’s rarely something that folks get excited about. Massive changes also tend to feel unnecessary (it worked before, why fix it?) and arbitrary (why did this thing change and that other thing didn’t?) How, then, to explain to users why changes were necessary, why you made the changes you did, and how to effectively use the new UI?

    (Twitter didn’t do a great job of explaining why it made a small but significant change last week, and users staged a minor revolt.)

    The Google AdWords team made a smart decision to make a video about changes to the AdWords administrative interface. Team members describe how they collected user feedback to inform changes to the interface, and how these changes make the user experience better. The video makes the interface changes feel necessary (they significantly improve site performance) and human (real people put lots of thought into how to make this better, and the new features represent their best efforts).